In this post we’ll show you where to get started in broadcasting yourself and your games online to twitch though the free broadcast software OBS.
Fist of all you need to download OBS from their site www.obsproject.com, You will also need to create an account on twitch, www.twitch.com.
Downloading Installing and Setup of OBS
Downloading
After going to www.obsproject.com you (at the time of writing this) will be given two options OBS Classic and OBS Studio. These instructions have been written for Classic so we suggest downloading OBS Classic. This Version is for windows only so if you have Linux or Mac download studio and see how far you get following the instructions.
Installation
Installing OBS is straight forward with no real options within the setup application, Being this is the case you cannot choose where you want to install the software. This can be inconvenient to users such as myself who likes to save the SSD for Operating System and the HDD for everything else.
Setup
Now If you didn’t select the (Open OBS after Installation) Check box in setup open OBS now.
- First thing is first Click Settings located bottom right of the OBS window first button.
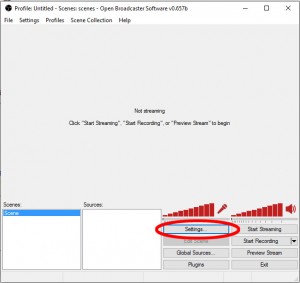
OBS Main Window Settings
- In the Settings window you will see you have a list of categories on the left, First thing we need to do is select Broadcast settings.
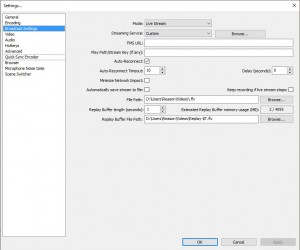
OBS Settings Window With Broadcast Selected
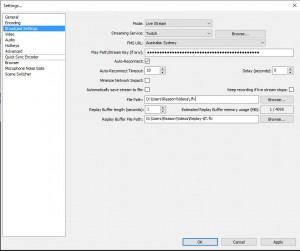
- At the stop of the Broadcast settings window you will see Streaming Service, click the drop down box and select twitch.
- Now that we have selected twitch as our streaming service we need to select what twitch server, it’s best to select one near where we are so under Streaming Service there is FMS URL click the drop down box for this and select a server that is closest to your location.
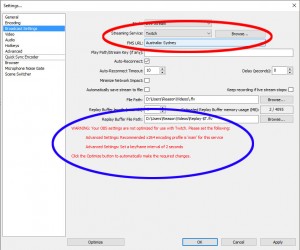
OBS Broadcast Settings
- You will noticed after selecting the streaming service that a Red Warning Will appear ‘Circled in blue’, Just follow these instructions and remember save each time and return back to Broadcast Settings after implementing each instruction to see if all errors have been fixed.
- We now must enter our twitch stream key for this we will need to login to our new twitch account.
- Once logged into Twitch you will notice a little arrow next to your username at the top of the page in the white title bar area, click this arrow and select dashboard from the drop down menu. Alternatively if your logged in you can type the URL directly into the address bar as follows ‘www.twitch.tv/[username]/dashboard’ replacing [username] with your twitch username.
- Once the dashboard page has loaded you will notice a heading called ‘Stream Key’ under the Dashboard heading click this.
- Once the next section loads click the Show Key Button, you will be given a warning click ‘I Understand’ and twitch will show you your stream key in a popup window.
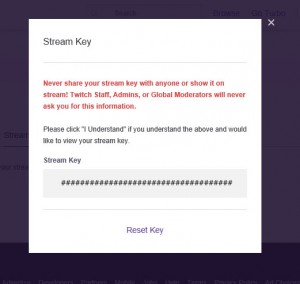
Twitch Stream Key Popup Censored
WARNING: NEVER SHARE YOUR STREAM KEY, ONCE OTHERS HAVE IT THEY CAN SPOIL YOUR REPUTATION BY TAKING OVER YOUR STREAMS! IF YOUR KEY IS EVER JEOPARDIZE CLICK THE RESET KEY BUTTON.
- Now copy the code to your clipboard (Ctrl-C for windows, Command-C for MAC) and paste (Ctrl-P for Windows, Command P for Mac) this code under Play path/Stream Key in the Broadcast Setting of OBS.
OBS Broadcast Settings No Warnings
- Now Apply these new settings and move to the Video Settings Category.
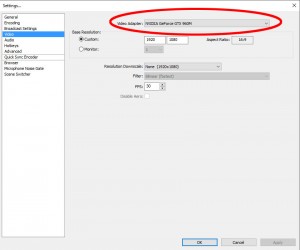
- Now Depending on your rigs setup you may have more then one video card, it’s important to tell OBS what card to read off by Choosing the appropriate card form the Video Adapter drop down menu.
OBS Video Settings
NOTE: On laptops With a Low and High Powered Graphics Adapter, Some games might not use your More powerful card. Depending on the game you may have to change what video adapter to read off. Also in rare cases you may have to disable the low powered card to for some games to use the high powered card. Remember stop recording/streaming change video adapter then restart your recording/streaming. If still no capture is occurring close OBS then restart it and try again. Then as a last resort disable the low powered video adapter.
- Now save these setting and the basic setup of your OBS is now completed now we move to our first capture.
Setup of OBS Scene
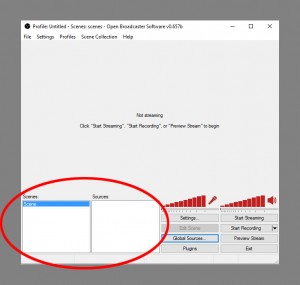
Now returning to the main OBS window the first thing we need to do is setup a scene, a scene in OBS is what they call all the elements that will be streamed off together this includes audio, camera, game footage etc. For our example will will capture a video of the player and a game.
- Down the bottom of the window you’ll notice two white boxes Scene and source with a scene already selected.
OBS Main Window Scene
- Now right click in the white space of the Source box and select Add from the popup menu, then Video Capture Device (providing you have a camera connected to your computer if not skip this). Name your capture device then OK then then clock OK again on the Video Capture Settings window.
- Now we need to capture a game so first of all start up a game to capture then (alt tab) back to OBS.
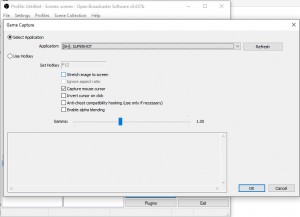
- Right Click again in the white space of sources selecting Add then select Game Capture, Name the capture.
- In the Game capture Settings Window Under Application Select the game you’ve launched to capture.
OBS Game Capture Settings
- Once you’ve selected the game Click OK
- Now to test in the main window press preview stream, OBS will preview what will be streaming, if for example you don’t see your camera it’s possible the order of sources is wrong. To fix this right click the source for your camera then selected order from the popup menu and move it UP above the game capture in the sources box.
- Now you can see your camera but it might be a little too big/small to fix this right click on the camera capture again and this time select Properties from the popup menu.
- In the video capture settings under the Video box check Custom Resolution and change the resolution to a more appropriate size.
- Once your all happy with this click OK and in the main window press Stop Preview then you can click Start Streaming to start your first broadcast.
Remember Always experiment and play with different settings to find the best fit for yourself, The worst that can happen is you might need to uninstall and reinstall OBS.
NOTE: In some cases game capture might not be the right source for a game you may need to choose window capture or even Monitor capture. Remember to always preview to make sure the capture is picking up your games.
Happy Gaming!!